Wednesday, November 20, 2024

How to Make Wooden Lawn Chairs with a Durable, Weather-Resistant Finish

How to Make Wooden Lawn Chairs with a Durable, Weather-Resistant Finish

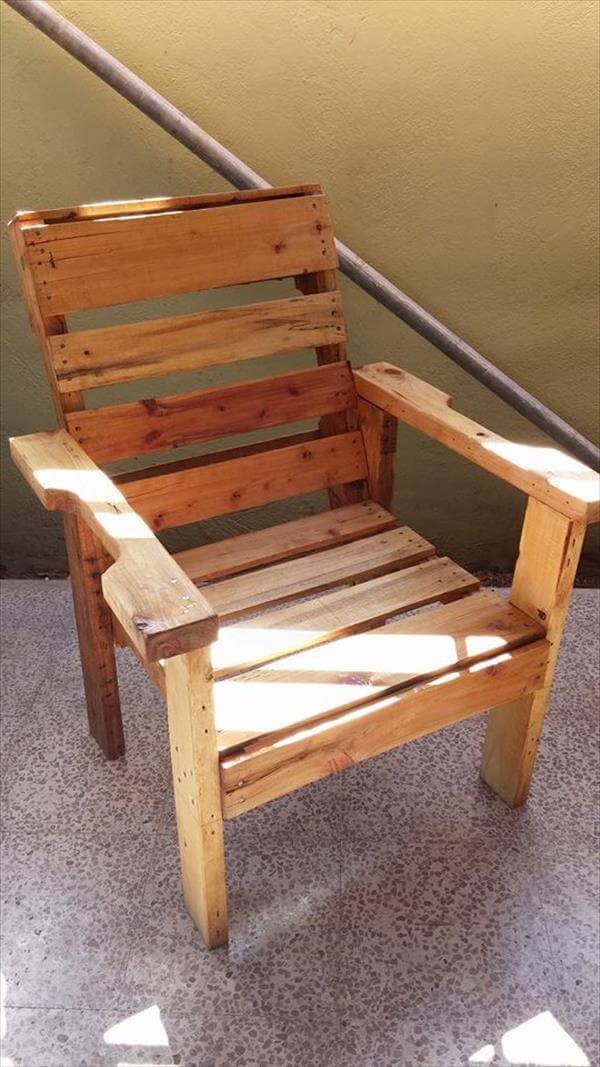
Building Durable, Weather-Resistant Wooden Lawn Chairs

Imagine yourself relaxing on a sunny afternoon, nestled in a comfortable wooden chair on your porch. The gentle breeze rustles the leaves, and the warmth of the sun bathes your skin. You take a sip of your iced tea and soak in the tranquil beauty of your surroundings. This idyllic scene is made even more enjoyable by the presence of sturdy, weather-resistant lawn chairs. These chairs will stand the test of time, enduring the elements and providing you with years of comfortable seating.

Building your own wooden lawn chairs is a rewarding project that allows you to customize them to your specific needs and style. While the process requires some basic woodworking skills, it’s achievable with the right tools and instructions. The key to ensuring their longevity and beauty lies in choosing the right wood and applying a durable, weather-resistant finish.

Choosing the Right Wood

The foundation of your lawn chairs is the wood you choose. Select a durable and weather-resistant species that can withstand the elements. Some excellent options include:

  • Cedar: Known for its natural resistance to rot, insects, and weathering, cedar is a popular choice for outdoor furniture. It also possesses a pleasant aroma.
  • Teak: Another highly durable and weather-resistant wood, teak naturally contains oils that protect it from moisture and decay. It develops a beautiful silver patina over time.
  • Redwood: This wood is naturally resistant to rot and insects and has a reddish-brown color that complements many outdoor settings.
  • Ipe: One of the densest and hardest woods, Ipe is incredibly durable and resistant to wear and tear. It also boasts a beautiful rich brown color.

When selecting your wood, look for boards that are free of knots, cracks, and other defects. Properly seasoned wood, meaning it has dried to a consistent moisture content, will also help prevent warping and cracking.

Building the Chairs

Now that you have your wood, it’s time to construct the chairs. You can find numerous plans online or in woodworking books. These plans will guide you through cutting the wood, joining the pieces, and assembling the chair.

Here are some key aspects of building wooden lawn chairs:

  • Use sturdy joinery: Mortise and tenon joints, dovetail joints, or even strong glue with screws will ensure your chairs are durable and long-lasting.
  • Choose the right hardware: Select screws and bolts made of stainless steel or galvanized steel to resist corrosion and ensure long-lasting strength.
  • Pay attention to ergonomics: Consider the angle of the back and seat to provide optimal comfort for sitting.

Applying a Weather-Resistant Finish

After construction, the final step is applying a weather-resistant finish. This will protect the wood from moisture, UV rays, and other elements, preserving its beauty and extending its lifespan.

Preparing the Wood

Before applying the finish, prepare the wood by sanding it smooth to remove any rough edges or imperfections. Be sure to remove any sawdust or debris before moving on to the next step.

Choosing the Right Finish

There are various options for weather-resistant finishes. Here are some popular choices:

  • Oil-based stain: This finish penetrates the wood, enhancing its natural grain and offering protection from moisture and UV rays. It typically requires multiple coats for optimal protection.
  • Water-based stain: This finish provides similar protection to oil-based stains but dries faster and emits fewer VOCs (volatile organic compounds). It's a more environmentally friendly option.
  • Marine varnish: Designed for harsh marine environments, marine varnish offers exceptional protection against moisture, UV rays, and abrasion. It requires regular maintenance to maintain its protective layer.
  • Paint: If you prefer a solid color, paint is a durable and affordable option. Choose exterior paint specifically designed for wood and formulated to resist fading and peeling.

Consider the desired look, level of protection, and maintenance requirements when choosing your finish.

Applying the Finish

Follow the manufacturer’s instructions carefully when applying your chosen finish. Use a quality brush, roller, or sprayer to apply the finish evenly. Allow adequate drying time between coats to ensure proper adhesion and protection.

By meticulously applying the finish, you’ll create a barrier that will protect your wooden lawn chairs from the elements and preserve their beauty for years to come.

Maintaining Your Chairs

To prolong the life of your wooden lawn chairs, maintain their finish regularly. Clean them with mild soap and water, and apply a fresh coat of finish as needed. Avoid using harsh chemicals or abrasives that can damage the finish. Store them in a dry place during inclement weather, or cover them with a waterproof tarp to protect them from moisture and UV rays. By following these simple maintenance tips, you can ensure your chairs remain beautiful and functional for many years.

Building your own wooden lawn chairs is a rewarding experience that allows you to create beautiful, durable outdoor furniture. By selecting the right wood, constructing them with care, and applying a weather-resistant finish, you’ll enjoy years of comfortable seating on your porch or patio. With a little effort and attention to detail, you can create heirloom-quality chairs that will become cherished pieces in your outdoor space.

Fun Christmas Wood Crafts for the Whole Family

Fun Christmas Wood Crafts for the Whole Family

Fun Christmas Wood Crafts for the Whole Family

Christmas is a time for family, friends, and of course, crafts! And what better material to work with than good old-fashioned wood? It's durable, versatile, and lends itself perfectly to the festive spirit. Get ready to gather your loved ones, dust off those sawhorses, and create some heartwarming Christmas memories together with these fun and easy wood crafts.

Classic Ornaments

Start with the classics! Making Christmas ornaments out of wood is a timeless tradition, and there are countless ways to personalize them.

Simple Shapes

Grab some scrap wood and cut out simple shapes like stars, snowflakes, hearts, or even Christmas trees. You can use a jigsaw for more intricate shapes or a handsaw for a rustic look. Once you have your shapes, smooth out any rough edges with sandpaper. You can leave them natural for a simple look or paint them in festive colours.

Embellishments

Let your creativity flow! You can decorate your ornaments with glitter, paint, felt, yarn, or even tiny bells. Add a touch of whimsy with beads, buttons, or even dried flowers. Don't forget to attach a ribbon or twine for hanging.

Personalized Ornaments

Make your ornaments extra special by personalizing them with names, dates, or even a family inside joke. You can carve initials into the wood with a small knife or use a woodburning tool for more detailed designs.

Wooden Christmas Village

A miniature Christmas village is a charming addition to any holiday décor, and building one together is a wonderful family activity. Here's how to get started:

Choose Your Design

Decide on the theme for your village. You can create a traditional snow scene, a modern cityscape, or even a fantasy world! Browse online for inspiration or use your own imagination.

Building the Houses

You can create the houses from scratch or use pre-made wooden house kits. If you're feeling adventurous, try using balsa wood or craft sticks for a more unique look. Once you have the houses built, paint them in festive colours and decorate them with details like windows, doors, and chimneys.

Adding the Touches

Make your village come alive with details! Add trees made from branches or twigs, fences, and even miniature figures. You can even use snow-white cotton balls to create a snowy scene. Don't forget to add a few twinkling lights for extra charm!

Rustic Christmas Signs

Wooden signs are perfect for adding a touch of rustic charm to your Christmas decor. They can display festive greetings, Christmas quotes, or even the names of your family members.

Cut and Shape

Start with a piece of plywood or reclaimed wood. Cut it into your desired shape â€" a rectangle, a circle, or even a Christmas tree shape. Smooth out the edges with sandpaper for a polished look.

Personalize Your Sign

You can add your message to the sign using paint, woodburning tools, stencils, or even decoupage. Don't be afraid to experiment with different colours and styles. You can even add embellishments like ribbons, bows, or dried flowers.

Mount and Display

Attach a hanger to the back of the sign with a nail or a sawtooth hanger. Choose a prominent spot in your home to display your rustic Christmas sign. You can even add a festive string of lights behind it for added ambiance.

Holiday Wreath Base

Skip the traditional greenery this year and create a unique wood-based wreath base. This is a fun project that requires minimal tools and skills.

Gather Materials

You'll need a saw, a drill, some screws, and a few pieces of wood. Consider using branches, pallet wood, or even leftover pieces from other wood projects.

Shape and Secure

Cut your wood into a circular or square shape, depending on your desired wreath style. Connect the pieces using wood glue and screws, ensuring a sturdy and secure base.

Decorate with Festive Charm

Let your creativity shine! Decorate your wreath base with festive decorations such as pine cones, berries, ribbons, and ornaments. You can even paint the base with holiday colours or create a unique design.

Tips for Wood Crafting with Kids

Working with wood can be a rewarding experience for children of all ages. Here are some tips for making it enjoyable and safe for everyone:

  • Choose kid-friendly tools and materials.
  • Start with simple projects and gradually increase the complexity as they gain experience.
  • Focus on fun and creativity rather than perfection.
  • Provide clear instructions and demonstrate each step before letting them try it themselves.
  • Supervise children closely while they are using tools and ensure they wear safety glasses.
  • Make it a collaborative experience. Work together on the project and let them contribute their own ideas and designs.
  • Safety Precautions

    Woodworking involves tools and materials that can be hazardous if not handled properly. Here are some safety tips to keep in mind:

  • Always wear safety glasses when using power tools.
  • Use a dust mask or respirator when sanding or cutting wood.
  • Store tools properly and keep them out of reach of children.
  • Be aware of your surroundings and avoid distractions while working with tools.
  • Never use power tools when you're tired or under the influence of alcohol or drugs.
  • Commonly Asked Questions

    Here are some answers to frequently asked questions about wood crafting for Christmas:

    What type of wood should I use for Christmas crafts?

    You can use a variety of woods for Christmas crafts, including pine, cedar, plywood, and even reclaimed wood. Choose a wood that is suitable for the project and the tools you have available.

    How do I clean up sawdust and wood shavings?

    Use a broom and dustpan to sweep up sawdust and shavings. For finer dust, you can use a shop vacuum. Always wear a dust mask when cleaning up wood debris.

    What are some affordable and fun Christmas crafts for kids?

    Here are a few ideas:

  • Wooden reindeer ornaments
  • Painted wood snowflakes
  • Wooden Christmas tree ornaments
  • Christmas tree-shaped coasters
  • How do I make my wood crafts last longer?

    You can seal your wood crafts with a clear sealant, such as polyurethane, to protect them from moisture and scratches. This will also help to enhance the natural beauty of the wood.

    So gather your family, grab some wood, and let the festive spirit inspire you to create some amazing Christmas crafts. You'll be creating cherished memories that will last a lifetime.

    Table Chess Projects That Are Perfect for Gift Shops and Craft Fairs

    Table Chess Projects That Are Perfect for Gift Shops and Craft Fairs

    Table Chess Projects That Are Perfect for Gift Shops and Craft Fairs

    Chess, the timeless game of strategy and intellect, has captivated minds for centuries. It's a game enjoyed by people of all ages, and its pieces have become iconic symbols of thought and competition. In the realm of crafting and gifting, chess projects offer a unique and engaging opportunity to create beautiful, functional, and personalized pieces. This article explores table chess projects that are perfect for showcasing at gift shops and craft fairs, captivating customers with their craftsmanship, artistry, and charm.

    The Allure of Chess Projects for Gift Shops and Craft Fairs

    Chess projects resonate with a diverse audience, appealing to both seasoned collectors and casual enthusiasts. Their versatility in terms of design, materials, and skill levels makes them highly adaptable to different tastes and budgets. Here's why chess projects stand out as ideal choices for gift shops and craft fairs:

    Uniqueness and Appeal

    Chess projects offer a unique and distinctive product category, setting them apart from typical craft fair offerings. Their intricate details, handcrafted nature, and potential for personalization create a sense of exclusiveness that attracts discerning customers. Moreover, the inherent beauty and artistry of chess sets appeal to both collectors and those seeking decorative pieces for their homes.

    Versatility in Style and Material

    Chess projects can be tailored to different aesthetics and budgets, from minimalist modern designs to ornate antique-inspired pieces. The use of various materials, including wood, metal, glass, resin, and ceramics, allows for endless possibilities in terms of texture, color, and finish. This diversity caters to a wide range of preferences and enables crafters to showcase their individual styles and skills.

    Gifting Potential

    Chess projects are excellent gift options for birthdays, holidays, and special occasions. They make thoughtful presents for chess enthusiasts, collectors, or anyone who appreciates craftsmanship and fine art. The personalized aspect of many chess projects, such as custom engravings or hand-painted designs, enhances their sentimental value and makes them truly special gifts.

    Popular Table Chess Projects for Gift Shops and Craft Fairs

    The possibilities for table chess projects are vast, ranging from simple and straightforward to intricate and elaborate. Below are some popular project ideas that have proven successful in attracting customers at gift shops and craft fairs:

    Miniature Chess Sets

    Miniature chess sets are compact and portable, making them ideal for travel, desk games, or as decorative accents. They are typically crafted from wood, metal, or ceramic and often feature detailed carvings and intricate designs. Miniature sets can be presented in elegant wooden boxes or travel cases, enhancing their appeal and value.

    Magnetic Chess Sets

    Magnetic chess sets offer convenience and portability, as the pieces adhere to the board, preventing accidental spills or movement. They are particularly suitable for families with young children or for those who appreciate the ease of magnetic play. Magnetic sets can be created using a variety of materials, including wood, metal, and even acrylic, offering creative possibilities for design and craftsmanship.

    Personalized Chess Sets

    Personalized chess sets add a unique touch to the game, allowing customers to create one-of-a-kind pieces that reflect their interests, memories, or personalities. Examples of personalization include:

    • Engraving names, initials, or special dates on the chessboard or pieces
    • Hand-painting the pieces with specific colors, patterns, or designs
    • Using wood from family heirlooms or other sentimental sources to craft the chess set

    Upcycled Chess Sets

    Upcycled chess sets add a sustainable and eco-friendly dimension to the craft. They involve repurposing materials such as old buttons, vintage jewelry, recycled wood, or discarded game pieces to create unique and whimsical chess sets. Upcycled projects highlight creativity, resourcefulness, and a commitment to environmental consciousness, resonating with a growing audience seeking sustainable options.

    Themed Chess Sets

    Themed chess sets add a playful and engaging element to the game. They often feature characters, symbols, or designs related to specific themes such as:

    • Fantasy and mythology: Dragons, wizards, elves, and other mythical creatures
    • Historical periods: Knights, kings, and queens from medieval times or other historical eras
    • Pop culture: Movie characters, comic book heroes, or popular video game figures

    Tips for Success at Gift Shops and Craft Fairs

    To maximize the success of your table chess projects at gift shops and craft fairs, consider the following tips:

    High-Quality Craftsmanship

    Attention to detail and a commitment to high-quality craftsmanship are essential for captivating customers. Invest time in precise cuts, smooth finishes, and meticulous painting or engraving to create chess sets that stand out with their quality and beauty.

    Eye-Catching Presentation

    Present your chess projects in a way that invites customers to interact with them. Use attractive display cases, wooden trays, or decorative stands to highlight the craftsmanship and elegance of your creations. Consider incorporating elements that enhance the visual appeal, such as background lighting, colorful fabrics, or complementary props.

    Informative Signage

    Provide clear and informative signage that details the materials used, the creation process, and the unique features of each chess set. Highlight personalized options and the story behind your creations to engage customers and pique their interest.

    Engaging Interactions

    Be prepared to engage customers in conversations about your chess projects. Share your passion for the game and your creative process, and answer any questions they may have about materials, techniques, or customization options. Building personal connections with customers can lead to sales and repeat business.

    Competitive Pricing

    Research the market to ensure that your prices are competitive while still reflecting the value and craftsmanship of your work. Offer a variety of price points to cater to different budgets, and consider special discounts or promotions to attract customers.

    Conclusion

    Table chess projects offer a unique and captivating product category for gift shops and craft fairs. Their versatility in design, materials, and skill levels, combined with their inherent beauty, functionality, and gifting potential, makes them a compelling choice for crafters seeking to attract a diverse audience. By focusing on high-quality craftsmanship, engaging presentation, and informative interactions, you can create chess sets that are not only visually stunning but also cherished as thoughtful gifts and prized possessions.

    Monday, November 18, 2024

    How to Sell Handmade Picture Frames on Etsy

    How to Sell Handmade Picture Frames on Etsy

    Unlocking Etsy Success: Selling Handmade Picture Frames

    In a world brimming with digital imagery, the art of displaying physical photographs remains a cherished tradition. As a craftsperson with a passion for creating beautiful things, you can tap into this enduring demand by selling handmade picture frames on Etsy. This platform, a haven for unique and handcrafted goods, provides the perfect marketplace for your artistic creations to shine. But how do you stand out in a crowded digital landscape and attract buyers eager to adorn their homes with your unique frames?

    This comprehensive guide will arm you with the knowledge and strategies to effectively market your handmade picture frames on Etsy. From crafting compelling listings to optimizing your shop's presence, we'll explore every aspect of successfully selling your creations. Let's dive in!

    Crafting Compelling Listings: The Heart of Your Etsy Shop

    Your Etsy listings are the shop windows showcasing your artistry to the world. They must captivate potential buyers with captivating visuals and informative descriptions.

    Enticing Images: First Impressions Matter

    High-quality images are non-negotiable. Capture your frames from various angles, showcasing their unique details. Use natural lighting for vibrant colors and avoid distracting backgrounds. Include close-ups highlighting intricate carvings, textures, or embellishments. Consider showcasing your frames in real-life settings to inspire customers' imaginations.

    Captivating Descriptions: Paint a Picture with Words

    Your product descriptions are your chance to tell the story behind your frames. Describe the materials used, the inspiration behind their design, and the craftsmanship involved. Highlight the dimensions, frame styles, and customization options available. Use vivid language that evokes emotions and paints a picture in the buyer's mind.

    Keywords: Unlocking Discoverability

    Strategic keyword usage is crucial for driving traffic to your listings. Research popular search terms related to picture frames, materials, styles, and sizes. Use a combination of broad and specific keywords throughout your listings to enhance their discoverability on Etsy's search engine.

    Building a Brand: Establishing Your Identity

    A consistent brand identity is essential for attracting loyal customers. Think of your Etsy shop as a reflection of your unique artistic voice.

    Shop Banner: A Visual Calling Card

    Create an eye-catching shop banner that embodies your brand's aesthetics. Use high-quality images, a consistent color scheme, and a concise message that reflects your shop's focus. This banner is the first impression your shop makes on visitors.

    Shop Policies: Transparency and Trust

    Clearly defined shop policies foster trust with potential customers. Outline your shipping times, return policies, and customization options. Be transparent about any limitations or exceptions to ensure clear expectations for both you and your buyers.

    Social Media: Connecting Beyond Etsy

    Extend your reach beyond Etsy by creating social media profiles dedicated to showcasing your handcrafted picture frames. Instagram, Pinterest, and Facebook offer excellent platforms for sharing your creative process, showcasing your work, and connecting with potential customers.

    Engaging Your Audience: Fostering Connections

    Building a thriving Etsy shop goes beyond just showcasing your products. Engaging with your customers and fostering a sense of community is crucial for long-term success.

    Customer Service: A Winning Formula

    Promptly respond to inquiries, address concerns with empathy, and strive to exceed customer expectations. Positive interactions build trust and encourage repeat business. Going the extra mile can leave a lasting impression.

    Promotions and Discounts: Generating Excitement

    Offer seasonal discounts, bundle deals, or special promotions to entice customers. Utilize Etsy's built-in promotional tools to reach a wider audience. These incentives can encourage impulse purchases and help clear inventory.

    Feedback and Reviews: The Voice of Your Customers

    Encourage customers to leave reviews. Positive feedback not only boosts your shop's credibility but also provides valuable insights for improvement. Respond to both positive and negative reviews professionally and constructively.

    Growth and Expansion: Scaling Your Success

    As your Etsy shop gains momentum, consider strategies to expand your reach and maximize your potential.

    Etsy Ads: Targeted Marketing

    Explore Etsy Ads to promote your listings to a broader audience. Target your ads based on keywords, demographics, and interests to ensure you reach the right customers. Etsy Ads provide a cost-effective way to increase visibility and drive traffic to your shop.

    New Product Lines: Expanding Your Horizons

    Consider expanding your product offerings. Introduce new frame styles, sizes, or materials to cater to diverse tastes and preferences. Explore complementary products such as custom artwork or personalized engravings to further engage your customers.

    Wholesale Opportunities: Reaching New Markets

    Explore wholesale opportunities to expand your reach beyond individual buyers. Partner with retailers, interior designers, or online marketplaces to offer your frames to a wider market. This strategy can significantly increase your sales volume and brand exposure.

    Selling handmade picture frames on Etsy is a rewarding journey that blends creativity and entrepreneurship. By following these strategies, you can create compelling listings, build a strong brand, engage with customers, and ultimately achieve success in this vibrant online marketplace. Remember, consistency, quality, and a genuine passion for your craft are key to standing out and thriving in the world of handmade goods.

    Wednesday, November 13, 2024

    How to Install Dado Joints in Your Next Woodworking Project

    How to Install Dado Joints in Your Next Woodworking Project

    Installing Dado Joints: A Guide to Strong, Precise Woodworking

    Dado joints are a strong and versatile woodworking joint that creates a groove across the width of a piece of wood. These grooves, called dados, allow you to perfectly fit a piece of wood (called a tongue) into them, creating a secure and stable joint. Dado joints are ideal for building cabinets, shelves, drawer boxes, and other projects where you need strong, straight, and even connections.

    While they might seem intimidating at first, installing dado joints isn't as complicated as it appears. With the right tools and a steady hand, you can achieve professional-looking results. This article will guide you through the process, step by step.

    Essential Tools for Success

    Before you start, ensure you have the necessary tools for this woodworking task:

    • Table saw or dado set: A dado set consists of specialized blades that create the groove for the dado joint. A table saw with a dado set provides the most precise and consistent results.
    • Circular saw or jig saw (optional): These can be used for rough cutting dadoes before using a table saw for a final cut.
    • Measuring tape and pencil: Precisely mark the location and dimensions of your dado joints.
    • Clamps: Secure the wood firmly to the table saw or workbench.
    • Safety goggles and hearing protection: Protect your eyes and ears from dust and noise.

    Steps to Mastering Dado Joints

    Follow these steps to create your perfect dado joints:

    1. Planning and Preparation

    Start by meticulously planning your project and carefully measuring the dimensions of the dado joint. Consider the thickness of the tongue and the desired depth of the dado.

    Mark the exact location of the dado on the wood piece using a pencil. You can use a combination square or a straightedge for added accuracy. Once marked, carefully measure and adjust the placement of the dado joint if necessary.

    2. Setting Up Your Table Saw

    Secure the dado set blades to your table saw following the manufacturer's instructions. Adjust the blade height to the desired depth of the dado. To ensure accurate cuts, ensure the table saw is level and the fence is securely attached. Experiment with test cuts on scrap wood to get a feel for the dado set before working on your project.

    3. Cutting the Dado

    Clamp the wood securely to your table saw's work surface. This will ensure it doesn't shift during the cut. Position the wood against the fence, aligning the marked line for the dado joint with the blade. Carefully pass the wood through the saw, making a clean and even cut.

    Repeat the process for the other side of the dado joint, adjusting the fence accordingly if needed. If you are cutting a dado joint across the entire width of the wood, you might need to perform multiple cuts to achieve the desired depth.

    4. Cleaning Up and Finishing

    Once the dado is cut, remove any burrs or imperfections using sandpaper or a chisel. Sand the dado joint smoothly for a clean and professional finish.

    Tips for Success

    Here are some valuable tips to enhance your dado-making skills:

    • Start with scrap wood: Practice making dado joints on scrap wood before tackling your project. This will help you become comfortable with the process and ensure you are achieving the desired results.
    • Go slow and steady: Avoid rushing the process. Slow and steady cuts are essential for a clean and precise dado joint.
    • Double-check your measurements: Accuracy is crucial. Re-measure your work before cutting to avoid costly mistakes.
    • Clean up any sawdust: Before joining pieces, remove any sawdust from the dado joint for a secure fit.

    Conclusion

    With patience, practice, and the right tools, mastering dado joints is achievable. Once you've mastered the basics, experiment with different dado joint variations, such as blind dados or through dados, for even more versatile woodworking projects.

    This guide provides a solid foundation for your journey into the world of dado joints. Remember, the most important thing is to enjoy the process and take pride in your creations. Happy woodworking!

    How to Make Wood Projects That Are Perfect for Gift-Giving

    How to Make Wood Projects That Are Perfect for Gift-Giving

    Crafting the Perfect Wooden Gift: A Guide to Handmade Charm

    There's a special magic in giving a handmade gift, and when that gift is crafted from wood, it carries a unique warmth and beauty. Whether you're a seasoned woodworker or a beginner eager to learn, making a wooden gift is a wonderful way to show your love and appreciation.

    But what makes a wooden gift truly special? It's not just about the wood itself, but the thoughtfulness behind its creation, the skill put into each detail, and the joy it brings to the recipient. This guide will help you craft wooden gifts that are truly one-of-a-kind and perfect for any occasion.

    Choosing the Right Wood for Your Project

    Wood is a wonderfully versatile material, and the choice of wood will greatly influence the look and feel of your final project. Consider the following:

    Appearance:

    • Oak: Strong, durable, with beautiful grain patterns. Ideal for sturdy, long-lasting gifts.
    • Cherry: Rich reddish-brown hue, often used for furniture and decorative items.
    • Maple: Known for its light, creamy color and attractive grain, popular for cutting boards and furniture.
    • Walnut: Deep brown with striking grain, prized for its beauty and durability.
    • Pine: Softwood, easy to work with, often used for rustic projects like birdhouses or signs.

    Durability:

    For items that need to withstand wear and tear, choose hardwoods like oak or walnut. For decorative items or those that won't see much use, softer woods like pine might be a better choice.

    Scent:

    Woods like cedar and redwood have a distinctive aroma that can add a unique sensory element to your project. Consider this if you're making items like scented boxes or organizers.

    Exploring a Variety of Gift Ideas

    Now that you have a wood in mind, let's explore some gift ideas:

    For the Home:

    • Cutting boards: Functional and beautiful, perfect for the home chef.
    • Wooden trays: Elegant and practical, ideal for serving snacks or displaying decorative items.
    • Jewelry boxes: Thoughtful and stylish, crafted to hold treasured keepsakes.
    • Wall art: A personalized piece of art that adds character to any space.

    For the Outdoors:

    • Birdhouses: A charming gift for nature lovers, inviting feathered friends to the garden.
    • Planters: Bring a touch of nature indoors or out with these elegant wooden planters.
    • Outdoor furniture: Create a comfortable and stylish seating area with handcrafted benches, chairs, or tables.

    For Kids:

    • Wooden toys: Durable and engaging, perfect for fostering imagination and creativity.
    • Personalized blocks: Encourage learning and fun with custom-made alphabet or number blocks.
    • Picture frames: Frame precious memories with unique, handmade frames.

    Adding the Finishing Touches: Personalization and Presentation

    The final touches are what truly elevate your wooden gift from ordinary to extraordinary. Consider these ideas for personalization and presentation:

    Personalization:

    • Engraving: Add a special message, name, or date to make the gift even more meaningful.
    • Inlay: Create intricate designs by incorporating pieces of contrasting wood or other materials.
    • Hand-painted details: Add a touch of color and creativity with hand-painted designs or patterns.

    Presentation:

    • Gift wrapping: Choose natural materials like burlap or kraft paper to complement the wooden gift.
    • Handmade tags: Attach a personalized tag with a heartfelt message.
    • Presentation box: Elevate the gift with a custom-made wooden box or a simple, elegant box lined with tissue paper.

    By selecting the right wood, choosing a meaningful project, and adding personal touches, you'll create a wooden gift that will be cherished for years to come. Remember, it's the heart and soul you put into your craft that truly makes a gift special.

    Wooden Benches with a Coastal or Nautical Style That Will Sell

    Wooden Benches with a Coastal or Nautical Style That Will Sell

    Capturing the Coastal Essence: Designing Wooden Benches for Success

    In the realm of home décor, the allure of the coast remains an enduring theme. The relaxed, inviting atmosphere of seaside living continues to inspire designers and homeowners alike. Wooden benches, with their inherent warmth and durability, offer a versatile canvas for capturing this coastal essence, creating pieces that not only enhance aesthetics but also drive sales.

    Understanding the Coastal Aesthetic

    Before delving into specific design elements, it's crucial to grasp the key components of the coastal aesthetic. It's a style characterized by a sense of tranquility and connection to nature. The color palette typically revolves around blues, greens, and white, mirroring the hues of the ocean, sky, and sand. Natural materials like wood, rope, and shells are prominently featured, adding a sense of authenticity and organic charm.

    Design Elements for Coastal Wooden Benches

    With an understanding of the coastal aesthetic, we can now explore specific design elements that will resonate with customers seeking this style.

    Wood Selection

    The choice of wood plays a pivotal role in achieving the desired coastal feel. Opt for light-colored woods like pine, cedar, or driftwood, which evoke a sense of natural beauty and bring a sense of airy lightness to the piece. Reclaimed wood, with its unique knots and imperfections, adds character and a touch of rustic charm.

    Color and Finish

    While white is a classic coastal choice, don't hesitate to experiment with other shades that complement the beachy vibe. Soft blues, greens, and sandy beige tones can add depth and visual interest. A distressed finish, achieved through sanding or painting techniques, lends a vintage, weathered look, reminiscent of seaside cottages and weathered docks.

    Shape and Proportions

    The shape of the bench can significantly influence its aesthetic appeal. Consider incorporating curved lines or rounded edges to create a sense of fluidity and movement, reminiscent of the gentle waves of the ocean. A bench with a slightly arched back can provide added comfort and visual interest. Ensure the proportions are balanced, creating a harmonious blend of elegance and practicality.

    Nautical Accents

    To further enhance the coastal or nautical theme, strategically incorporate nautical accents into the design. These could include:

    • Rope details: Woven into the backrest, armrests, or even the base, rope adds a touch of nautical authenticity.
    • Seashell embellishments: Scattered across the backrest or incorporated into a decorative element, seashells create a subtle yet effective touch.
    • Anchor motifs: Intricately carved or painted on the backrest or legs, anchors serve as a strong symbol of the sea.
    • Marine-inspired hardware: Nautical-themed hardware, such as hinges or handles, adds a touch of sophistication.

    Marketing and Presentation

    Once you've created beautiful coastal wooden benches, it's crucial to market them effectively. To maximize sales potential, consider the following:

    High-Quality Photography

    Invest in professional photography that showcases your benches in their best light. Capture their intricate details, unique textures, and overall appeal. Use natural lighting to enhance the wood's natural warmth and the coastal ambiance.

    Compelling Descriptions

    Write detailed and captivating product descriptions that highlight the design elements, materials, and craftsmanship. Evoking a sense of tranquility, relaxation, and connection to nature will attract customers seeking the coastal vibe.

    Targeted Marketing

    Reach the right audience through targeted marketing strategies. Utilize online platforms and social media to showcase your benches to individuals interested in coastal décor, nautical themes, and outdoor living.

    Showcase in Coastal Settings

    If possible, showcase your benches in settings that evoke the coastal lifestyle. Consider partnering with local businesses or events that cater to this market, such as beachside restaurants, coastal boutiques, or home decor shows.

    Conclusion

    Designing wooden benches with a coastal or nautical style requires a careful blend of aesthetics and practicality. By understanding the key elements of the coastal aesthetic, incorporating thoughtful design details, and implementing effective marketing strategies, you can create pieces that capture the spirit of the coast and resonate with customers seeking this timeless and alluring style. With the right approach, your wooden benches will become coveted additions to homes and outdoor spaces, bringing a touch of seaside charm wherever they are placed.

    How to Build a Wooden Plant Stand with a Minimalist Aesthetic

    How to Build a Wooden Plant Stand with a Minimalist Aesthetic

    Building a Minimalist Wooden Plant Stand: A Step-by-Step Guide

    Hey there, plant lovers! Are you tired of seeing your beloved greenery crammed on windowsills or awkwardly perched on furniture? It's time to elevate your plant game with a stylish and functional wooden plant stand. Not only will it add a touch of minimalist chic to your space, but it'll also make your plants the stars of the show.

    Don't worry if you're not a seasoned woodworker. This DIY project is surprisingly easy and doesn't require a ton of fancy tools. We'll walk through the steps together, and by the end, you'll have a stunning plant stand that you can proudly display in your home. Let's get started!

    Gather Your Materials and Tools

    First things first, we need to get our hands on the essentials. Here's a shopping list to help you get started:

    Materials

    • Wood: You can choose from various wood types, such as pine, cedar, or oak, based on your preference and budget. We'll use 1x6 boards for this project, but feel free to adjust the dimensions based on the size you desire.
    • Wood glue: A good quality wood glue is essential for strong and durable joints.
    • Wood screws: Choose screws that are long enough to securely fasten the pieces of wood together.
    • Wood stain (optional): This is for adding a beautiful finish to your plant stand. Choose a stain that complements your décor.
    • Wood sealant (optional): A sealant protects the wood from scratches and spills, extending its life.
    • Sandpaper (various grits): This is for smoothing out the wood and creating a smooth finish.

    Tools

    • Miter saw or circular saw: For precise cuts.
    • Measuring tape and pencil: For marking cuts and dimensions.
    • Clamps: To hold the wood pieces together while gluing.
    • Drill: For drilling pilot holes and attaching screws.
    • Screwdriver: To tighten the screws.
    • Safety glasses: Always protect your eyes when working with wood.

    Designing Your Minimalist Plant Stand

    Now, let's get creative! The beauty of a minimalist plant stand lies in its simplicity. You can choose from various designs, but the key is to keep things clean and clutter-free. Here are a few ideas:

    Simple Shelf Design

    This design features a single, sturdy shelf. It's perfect for showcasing a large potted plant or grouping smaller pots together. The shelf can be rectangular, square, or even circular, depending on your preference.

    Stacked Shelf Design

    For multiple plants, consider a stacked shelf design. Two or three shelves provide ample space for your leafy friends while maintaining a minimalist aesthetic. You can choose varying shelf heights to accommodate different plant sizes.

    Tripod Design

    Want to add a touch of whimsy? Try a tripod design! Three legs create a sturdy base, while a single shelf sits on top, perfect for showcasing your favorite plant. This design is perfect for adding a modern vibe to your space.

    Cutting the Wood

    Once you've finalized your design, it's time to cut the wood. Using your miter saw or circular saw, measure and mark the wood according to your design plans. Be precise with your cuts for a professional-looking finish.

    Remember, safety first! Wear safety glasses while cutting wood. Don't rush the process and take your time to ensure clean and accurate cuts. If you're new to cutting wood, practice on scrap pieces before working with your final wood.

    Assembling the Plant Stand

    With your wood pieces cut, it's time to bring your plant stand to life!

    Gluing and Clamping

    Start by applying a thin layer of wood glue to the surfaces you want to join. Make sure the glue is evenly distributed. Then, carefully clamp the pieces together, ensuring they're aligned properly. Use multiple clamps to provide adequate pressure and hold the pieces securely in place.

    Allow the glue to dry completely according to the manufacturer's instructions. This typically takes about 24 hours. Don't rush this step, as allowing the glue to dry properly ensures a strong and durable bond.

    Drilling Pilot Holes and Securing with Screws

    Once the glue has dried, drill pilot holes through the wood to prevent splitting. The pilot holes should be slightly smaller than the diameter of your screws. This helps guide the screws and prevent them from damaging the wood.

    Now, attach the pieces of wood together with screws. Drive the screws in with a screwdriver, making sure they are securely fastened.

    Finishing Touches

    Your plant stand is almost complete! It's time to add those final touches to make it truly shine.

    Sanding

    Sanding smooths out the surface of the wood and creates a beautiful finish. Start with coarse-grit sandpaper to remove any rough edges. Then, gradually move to finer grit sandpaper to achieve a smooth and even finish. Remember to sand in the direction of the wood grain for best results.

    Staining and Sealing (Optional)

    To add a touch of color and protection, you can stain and seal your plant stand. Apply the stain evenly with a brush or cloth, following the manufacturer's instructions. Allow the stain to dry completely before applying the sealant.

    The sealant creates a protective barrier against scratches, spills, and moisture. It also enhances the wood's natural beauty, giving it a polished look. Apply the sealant with a brush or cloth, following the manufacturer's instructions.

    Your Beautiful Minimalist Plant Stand

    Congratulations! You've successfully built a stunning minimalist plant stand that will elevate your home décor and make your plants the stars of the show! Now, take a moment to admire your handiwork and enjoy the pride of creating something beautiful with your own two hands.

    Don't be afraid to experiment with different designs and finishes to create a plant stand that truly reflects your unique style. Have fun, get creative, and let your inner plant parent shine!

    How to Build a Wooden Plant Stand with a Minimalist Aesthetic

    How to Build a Wooden Plant Stand with a Minimalist Aesthetic

    Building a Minimalist Wooden Plant Stand: A Step-by-Step Guide

    Hey there, plant lovers! Are you tired of seeing your beloved greenery crammed on windowsills or awkwardly perched on furniture? It's time to elevate your plant game with a stylish and functional wooden plant stand. Not only will it add a touch of minimalist chic to your space, but it'll also make your plants the stars of the show.

    Don't worry if you're not a seasoned woodworker. This DIY project is surprisingly easy and doesn't require a ton of fancy tools. We'll walk through the steps together, and by the end, you'll have a stunning plant stand that you can proudly display in your home. Let's get started!

    Gather Your Materials and Tools

    First things first, we need to get our hands on the essentials. Here's a shopping list to help you get started:

    Materials

    • Wood: You can choose from various wood types, such as pine, cedar, or oak, based on your preference and budget. We'll use 1x6 boards for this project, but feel free to adjust the dimensions based on the size you desire.
    • Wood glue: A good quality wood glue is essential for strong and durable joints.
    • Wood screws: Choose screws that are long enough to securely fasten the pieces of wood together.
    • Wood stain (optional): This is for adding a beautiful finish to your plant stand. Choose a stain that complements your décor.
    • Wood sealant (optional): A sealant protects the wood from scratches and spills, extending its life.
    • Sandpaper (various grits): This is for smoothing out the wood and creating a smooth finish.

    Tools

    • Miter saw or circular saw: For precise cuts.
    • Measuring tape and pencil: For marking cuts and dimensions.
    • Clamps: To hold the wood pieces together while gluing.
    • Drill: For drilling pilot holes and attaching screws.
    • Screwdriver: To tighten the screws.
    • Safety glasses: Always protect your eyes when working with wood.

    Designing Your Minimalist Plant Stand

    Now, let's get creative! The beauty of a minimalist plant stand lies in its simplicity. You can choose from various designs, but the key is to keep things clean and clutter-free. Here are a few ideas:

    Simple Shelf Design

    This design features a single, sturdy shelf. It's perfect for showcasing a large potted plant or grouping smaller pots together. The shelf can be rectangular, square, or even circular, depending on your preference.

    Stacked Shelf Design

    For multiple plants, consider a stacked shelf design. Two or three shelves provide ample space for your leafy friends while maintaining a minimalist aesthetic. You can choose varying shelf heights to accommodate different plant sizes.

    Tripod Design

    Want to add a touch of whimsy? Try a tripod design! Three legs create a sturdy base, while a single shelf sits on top, perfect for showcasing your favorite plant. This design is perfect for adding a modern vibe to your space.

    Cutting the Wood

    Once you've finalized your design, it's time to cut the wood. Using your miter saw or circular saw, measure and mark the wood according to your design plans. Be precise with your cuts for a professional-looking finish.

    Remember, safety first! Wear safety glasses while cutting wood. Don't rush the process and take your time to ensure clean and accurate cuts. If you're new to cutting wood, practice on scrap pieces before working with your final wood.

    Assembling the Plant Stand

    With your wood pieces cut, it's time to bring your plant stand to life!

    Gluing and Clamping

    Start by applying a thin layer of wood glue to the surfaces you want to join. Make sure the glue is evenly distributed. Then, carefully clamp the pieces together, ensuring they're aligned properly. Use multiple clamps to provide adequate pressure and hold the pieces securely in place.

    Allow the glue to dry completely according to the manufacturer's instructions. This typically takes about 24 hours. Don't rush this step, as allowing the glue to dry properly ensures a strong and durable bond.

    Drilling Pilot Holes and Securing with Screws

    Once the glue has dried, drill pilot holes through the wood to prevent splitting. The pilot holes should be slightly smaller than the diameter of your screws. This helps guide the screws and prevent them from damaging the wood.

    Now, attach the pieces of wood together with screws. Drive the screws in with a screwdriver, making sure they are securely fastened.

    Finishing Touches

    Your plant stand is almost complete! It's time to add those final touches to make it truly shine.

    Sanding

    Sanding smooths out the surface of the wood and creates a beautiful finish. Start with coarse-grit sandpaper to remove any rough edges. Then, gradually move to finer grit sandpaper to achieve a smooth and even finish. Remember to sand in the direction of the wood grain for best results.

    Staining and Sealing (Optional)

    To add a touch of color and protection, you can stain and seal your plant stand. Apply the stain evenly with a brush or cloth, following the manufacturer's instructions. Allow the stain to dry completely before applying the sealant.

    The sealant creates a protective barrier against scratches, spills, and moisture. It also enhances the wood's natural beauty, giving it a polished look. Apply the sealant with a brush or cloth, following the manufacturer's instructions.

    Your Beautiful Minimalist Plant Stand

    Congratulations! You've successfully built a stunning minimalist plant stand that will elevate your home décor and make your plants the stars of the show! Now, take a moment to admire your handiwork and enjoy the pride of creating something beautiful with your own two hands.

    Don't be afraid to experiment with different designs and finishes to create a plant stand that truly reflects your unique style. Have fun, get creative, and let your inner plant parent shine!

    How to Craft Custom Wooden Blanket Ladders to Sell Online

    How to Craft Custom Wooden Blanket Ladders to Sell Online

    How to Craft Custom Wooden Blanket Ladders to Sell Online: A Guide for the DIY Enthusiast

    Hey there, fellow crafters and entrepreneurs! Are you looking for a unique and in-demand product to sell online? Look no further than custom wooden blanket ladders! These charming and functional pieces are perfect for adding a touch of rustic elegance to any home while offering a practical solution for organizing blankets and throws.

    In this guide, we'll walk you through everything you need to know about crafting and selling your very own wooden blanket ladders, from choosing the right materials and tools to marketing your products and building your online presence. Let's dive in!

    Crafting the Perfect Blanket Ladder: A Step-by-Step Guide

    Building a wooden blanket ladder is a surprisingly simple project, even for beginners. With the right tools and a bit of patience, you can create a beautiful and functional piece that will impress your customers.

    Materials and Tools:

    You'll need the following materials and tools to get started:

    • Wood: Choose sturdy wood like pine, oak, or maple.
    • Wood glue
    • Wood screws
    • Sandpaper (various grits)
    • Saw (circular or miter saw)
    • Drill
    • Measuring tape
    • Pencil
    • Level
    • Clamps
    • Wood stain or paint (optional)
    • Finishing oil or sealant (optional)

    Construction Process:

    Now, let's break down the building process into simple steps:

    1. Cut the wood: Measure and cut the wood for the rungs and sides of the ladder. You can use a circular saw or miter saw for this.
    2. Assemble the rungs: Use wood glue and screws to attach the rungs to the sides of the ladder. Ensure the rungs are evenly spaced and secure.
    3. Sand the ladder: Sand the entire ladder to smooth out any rough edges and create a finished look.
    4. Finish the ladder: Apply a wood stain or paint to the ladder, if desired. You can also use a finishing oil or sealant to protect the wood and enhance its natural beauty.

    Customizing Your Wooden Blanket Ladders: A Creative Approach

    One of the best things about crafting wooden blanket ladders is the opportunity to personalize them. By incorporating different designs and finishes, you can cater to the unique tastes of your customers. Here are some creative ideas to get your gears turning:

    Design Options:

    • Shape: Experiment with different shapes for the rungs, such as rounded, curved, or even chevron patterns.
    • Size: Offer various sizes to accommodate different spaces and blanket needs. You can even create miniature versions for children's rooms.
    • Style: Play with different styles, from farmhouse chic to modern minimalist to create a range of options for diverse customer preferences.

    Finish Options:

    • Stains: Use various wood stains to create different colors and finishes, from classic walnut to light honey.
    • Paints: Get creative with paint colors and patterns to give your ladders a unique touch. Try using a distressed paint technique for a vintage look.
    • Hardware: Add decorative hardware like knobs or hooks to further enhance the design.

    Marketing Your Custom Wooden Blanket Ladders: Reaching Your Target Audience

    Now that you have a beautiful and functional product, it's time to get the word out! Here's how to market your custom wooden blanket ladders online:

    Online Platforms:

    • Etsy: This marketplace is perfect for handmade and vintage items. It's a great platform to reach a large audience of potential buyers interested in unique home decor.
    • Amazon Handmade: Another excellent option for selling handmade goods. Amazon's massive customer base provides a significant advantage for reaching a wider audience.
    • Your own website: Create a website to showcase your products and build a brand identity. This gives you more control over your online presence and branding.
    • Social Media: Use platforms like Instagram, Pinterest, and Facebook to share stunning photos of your products and engage with potential customers.

    Marketing Strategies:

    • High-quality photos: Take professional-looking photos of your products to highlight their beauty and craftsmanship.
    • Compelling product descriptions: Write engaging and informative descriptions that showcase the benefits and unique features of your blanket ladders.
    • Promote your products: Utilize social media advertising, email marketing, and influencer collaborations to reach a wider audience.
    • Customer service: Provide excellent customer service to build trust and loyalty. Respond to inquiries promptly and offer a seamless buying experience.

    Pricing Your Wooden Blanket Ladders: Finding the Sweet Spot

    Setting the right price for your products is crucial for both profitability and customer satisfaction. Consider the following factors when determining your pricing strategy:

    • Cost of materials: Calculate the cost of wood, hardware, and other materials needed for production.
    • Labor costs: Factor in the time and effort involved in crafting each ladder.
    • Competition: Research the prices of similar products offered by other sellers.
    • Value proposition: Highlight the unique features and quality of your custom-made ladders to justify a premium price.

    You might want to start with a slightly higher price point and gradually adjust based on market demand. You can also offer different price tiers based on the size, design, and finish of your ladders.

    Building Your Brand and Standing Out from the Crowd

    In a crowded marketplace, it's essential to differentiate yourself and build a strong brand identity. Here are some tips to help you stand out:

    • Define your brand story: What makes your products unique? What values do you represent? Share your story with your customers to connect with them on a deeper level.
    • Create a consistent brand aesthetic: Use a consistent color palette, typography, and imagery across all your marketing materials to create a cohesive brand identity.
    • Engage with your customers: Build a community around your brand by responding to comments, sharing behind-the-scenes content, and hosting contests or giveaways.
    • Offer exceptional customer service: Go the extra mile to ensure your customers are satisfied. This will build trust and encourage repeat business.

    By following these tips and putting your heart into your craft, you can create a successful online business selling custom wooden blanket ladders. Remember, passion, creativity, and dedication are the keys to building a thriving business. So, get crafting, embrace your entrepreneurial spirit, and watch your business flourish!

    Woodworking Gifts for Kids: Fun and Educational Projects

    Woodworking Gifts for Kids: Fun and Educational Projects

    Woodworking Gifts for Kids: Fun and Educational Projects

    Woodworking is a timeless craft that offers numerous benefits for children, from fostering creativity and problem-solving skills to nurturing patience and attention to detail. By introducing children to woodworking, you're not just gifting them a hobby, but also empowering them with valuable life skills that will serve them well throughout their lives. In this article, we will explore a range of woodworking projects that are both fun and educational, making them perfect gifts for young woodworkers.

    Benefits of Woodworking for Kids

    Woodworking is more than just a hobby; it's a valuable learning experience. Engaging in woodworking projects offers numerous benefits for children, including:

    Developing Fine Motor Skills

    Holding tools, manipulating wood, and making precise cuts all contribute to the development of fine motor skills, which are essential for tasks like writing, drawing, and playing musical instruments.

    Boosting Creativity and Imagination

    Woodworking allows children to bring their ideas to life. They can design, plan, and execute their own projects, fostering their creativity and imagination.

    Improving Problem-Solving Skills

    Encountering challenges and finding solutions is an integral part of woodworking. This process helps children develop critical thinking and problem-solving skills, preparing them for academic and real-world challenges.

    Encouraging Patience and Perseverance

    Woodworking projects often require time, patience, and perseverance. Children learn to stay focused and work diligently to achieve their goals, developing valuable life skills.

    Building Self-Confidence and a Sense of Accomplishment

    Completing a woodworking project, from start to finish, provides children with a sense of accomplishment and pride. It boosts their self-confidence and encourages them to tackle new challenges.

    Beginner Woodworking Projects for Kids

    For young woodworkers starting their journey, these beginner-friendly projects are a perfect introduction to the world of woodworking:

    Wooden Coasters

    Simple, yet practical, wooden coasters are a great starting point. Children can learn basic cutting, sanding, and finishing techniques while creating a useful and decorative item for their room.

    • Materials: Wood scraps, sandpaper, wood glue, wood stain or paint (optional)
    • Tools: Saw, drill, measuring tape, pencil, sanding block, safety goggles
    • Instructions: Cut the wood scraps into square or circular shapes. Sand the edges smooth. Glue two pieces together to create a thicker coaster. Optional: Stain or paint the coasters.

    Birdhouse

    Building a birdhouse is a fun and rewarding project that combines woodworking skills with a touch of nature. Children can choose their design and paint it to their liking, attracting feathered friends to their backyard.

    • Materials: Wooden planks, screws, nails, hammer, drill, sandpaper, paint or stain (optional)
    • Tools: Saw, drill, measuring tape, pencil, screwdriver, sanding block, safety goggles
    • Instructions: Cut the wood planks to create the birdhouse base, walls, roof, and entrance hole. Assemble the pieces using screws and nails. Sand the surfaces smooth. Decorate the birdhouse with paint or stain.

    Wooden Toys

    Imagination runs wild when children create their own wooden toys. From simple blocks to intricate puzzles, the possibilities are endless. This project encourages creativity and problem-solving skills.

    • Materials: Wooden blocks, dowels, sandpaper, wood glue, paint or stain (optional)
    • Tools: Saw, drill, measuring tape, pencil, sanding block, safety goggles
    • Instructions: Cut wooden blocks or dowels into different shapes. Sand the edges smooth. Glue the pieces together to create different toys, such as blocks, cars, or puzzles. Paint or stain the toys to add personality.

    Intermediate Woodworking Projects for Kids

    As children gain experience and confidence, they can move on to more challenging projects that further develop their skills:

    Small Table

    Building a small table requires careful planning and execution, allowing children to practice their measuring, cutting, and assembly skills. They can design the table's shape and choose the finish.

    • Materials: Wooden boards, screws, nails, hammer, drill, sandpaper, wood glue, paint or stain (optional)
    • Tools: Saw, drill, measuring tape, pencil, screwdriver, sanding block, safety goggles
    • Instructions: Cut the boards to create the tabletop, legs, and supports. Assemble the pieces using screws, nails, and wood glue. Sand the surfaces smooth. Decorate the table with paint or stain.

    Wooden Picture Frame

    Creating a personalized picture frame allows children to showcase their favorite photos and memories. They can choose the wood type, design, and finish, making it a meaningful gift for themselves or a loved one.

    • Materials: Wooden strips, miter saw (optional), screws, nails, hammer, drill, sandpaper, wood glue, paint or stain (optional)
    • Tools: Miter saw (optional), drill, measuring tape, pencil, screwdriver, sanding block, safety goggles
    • Instructions: Cut the wooden strips into equal lengths. Join the strips using a miter saw (optional) or by cutting them at a 45-degree angle. Assemble the frame using screws, nails, and wood glue. Sand the surfaces smooth. Decorate the frame with paint or stain.

    Small Jewelry Box

    Building a small jewelry box requires careful planning and attention to detail. Children can design the box's shape, size, and compartments, developing their creativity and problem-solving skills while crafting a practical and personal item.

    • Materials: Wooden boards, hinges, latch, screws, nails, hammer, drill, sandpaper, wood glue, paint or stain (optional)
    • Tools: Saw, drill, measuring tape, pencil, screwdriver, sanding block, safety goggles
    • Instructions: Cut the boards to create the box's base, sides, lid, and compartments. Assemble the pieces using screws, nails, and wood glue. Attach the hinges and latch. Sand the surfaces smooth. Decorate the box with paint or stain.

    Safety Precautions in Woodworking

    Safety is paramount in woodworking, especially when children are involved. It's essential to emphasize safety precautions and supervise children throughout their woodworking projects. Here are some key safety measures to keep in mind:

    • Always wear safety goggles to protect your eyes from flying debris.
    • Use sharp tools correctly and with care. Teach children how to handle tools safely and properly.
    • Work in a well-ventilated area to avoid inhaling sawdust.
    • Keep the work area clean and organized to prevent accidents.
    • Supervise children closely, especially when using power tools. Never leave them unattended.
    • Teach children about the dangers of power tools and how to use them safely.
    • Provide proper training and guidance before allowing children to use any tools.
    • Encourage children to use protective gear, such as gloves and dust masks, whenever appropriate.

    Choosing the Right Wood for Kids

    Choosing the right wood is crucial for successful woodworking projects. For beginners, softer woods like pine, basswood, and cedar are excellent choices due to their ease of working with and forgiving nature. Here are some popular wood choices for kids:

    • Pine: A softwood that is readily available and affordable. It's easy to work with and accepts stain and paint well.
    • Basswood: A hardwood known for its light color and smooth texture. It's easy to carve and sand, making it suitable for detailed projects.
    • Cedar: A fragrant wood with a natural resistance to insects and decay. It's a good choice for outdoor projects like birdhouses.

    Encouraging Creativity and Learning

    Woodworking projects should be fun and engaging for children. Encourage them to explore their creativity and make their projects unique. Provide them with different wood finishes, paints, and embellishments to personalize their creations. Remember, woodworking is a journey, not a race. Allow children to take their time, experiment, and learn at their own pace.

    Woodworking is a valuable gift that offers children endless opportunities for learning, growth, and creativity. By introducing them to this timeless craft, you're equipping them with skills that will benefit them for years to come.

    Celebrate Life's Moments with Wooden Gifts

    Celebrate Life's Moments with Wooden Gifts

    Celebrate Life's Moments with Wooden Gifts

    In the tapestry of life, moments weave intricate patterns, each thread imbued with significance and emotion. From joyous occasions to quiet milestones, these moments deserve to be cherished and celebrated. While a myriad of gift options exists, wooden gifts possess an inherent warmth and enduring quality that makes them particularly suitable for commemorating life's precious events.

    Wooden gifts transcend mere material possessions; they embody the spirit of nature, whispering tales of timelessness and craftsmanship. The grain patterns, knots, and color variations are unique to each piece, reflecting the individual beauty of the tree from which it originated. Their tactile nature invites touch, creating a connection that resonates deeply within us. When we gift wood, we bestow more than just an object; we offer a piece of nature's artistry, a symbol of resilience and growth.

    The Enduring Appeal of Wooden Gifts

    The appeal of wooden gifts lies in their versatility, durability, and inherent beauty. They gracefully adapt to a range of occasions, from intimate gatherings to grand celebrations. The timeless elegance of wood complements any aesthetic, seamlessly blending into both modern and traditional settings.

    Versatility: A Gift for Every Occasion

    Wooden gifts transcend the boundaries of specific occasions, effortlessly transitioning from celebratory events to everyday expressions of affection. For birthdays, consider personalized wooden ornaments, engraved picture frames, or handcrafted wooden jewelry boxes. For anniversaries, a vintage-inspired wooden clock or a hand-carved wooden sculpture can symbolize the enduring nature of your commitment.

    Graduations call for thoughtful gifts that acknowledge the achievements and aspirations of the graduate. A customized wooden desk organizer or a beautifully crafted wooden pen set can inspire and empower the recipient in their future endeavors. Weddings, with their promise of a lifetime together, deserve enduring gifts, such as wooden keepsake boxes, engraved cutting boards, or timeless wooden picture frames.

    Durability: A Gift That Lasts

    Wooden gifts possess an inherent durability that sets them apart from fleeting trends. Their solid construction and natural resistance to wear and tear ensure that they will be cherished for generations to come. A well-crafted wooden box, for instance, can hold precious memories and heirlooms, its story unfolding with each passing year.

    Beauty: A Gift That Inspires

    The beauty of wood lies in its natural artistry. Each piece reveals a unique grain pattern, knots, and color variations, creating a visual tapestry that captures the essence of nature. Whether polished to a smooth sheen or left in its natural state, the texture of wood invites touch, evoking a sense of warmth and connection. A wooden sculpture, for instance, can become a conversation starter, its intricate details and graceful curves adding a touch of elegance to any space.

    Types of Wooden Gifts for Every Occasion

    The world of wooden gifts is diverse, offering a plethora of options to suit various tastes and preferences.

    Personalized Gifts

    Personalized wooden gifts are particularly meaningful, adding a personal touch that elevates the gesture. Engraved wooden photo frames, for instance, can display treasured memories, while custom-made wooden jewelry boxes can hold precious trinkets and keepsakes. Engraved wooden cutting boards, adorned with names, dates, or special messages, become cherished family heirlooms.

    Functional Gifts

    Wooden gifts can seamlessly blend practicality and aesthetics, making them ideal for everyday use. Wooden kitchen utensils, such as rolling pins, spatulas, and cutting boards, add a touch of warmth and charm to culinary endeavors. A sturdy wooden tray, meticulously crafted and beautifully finished, can serve as a stylish centerpiece for serving tea or cocktails.

    Decorative Gifts

    Wooden gifts can enhance the ambiance of any space, adding a touch of rustic charm or modern sophistication. Hand-carved wooden sculptures, intricate in detail and graceful in form, can become focal points in any room. Wooden picture frames, with their timeless elegance, showcase cherished photographs and artwork.

    The Art of Giving Wooden Gifts

    Gifting wood is not just about the object; it is about conveying emotions and creating lasting memories. The choice of wood, the craftsmanship, and the personal touch you bring to the gift are all crucial elements in expressing your sentiment. The presentation is equally important, enhancing the overall impact of the gift.

    Consider packaging the wooden gift in a natural fabric, such as linen or burlap, to emphasize the connection to nature. A handwritten note, expressing your love and appreciation, adds a heartfelt touch. Deliver the gift in person whenever possible, allowing you to share the joy of giving and receive the recipient's gratitude in real time.

    Beyond the Gift: Sustainable Practices

    The beauty of wooden gifts is further enhanced when they are sourced sustainably. Choosing gifts made from responsibly managed forests ensures that future generations will have access to the beauty and benefits of wood. Look for certifications such as the Forest Stewardship Council (FSC) label, which guarantees that the wood used in the product comes from well-managed forests.

    Celebrating life's moments with wooden gifts is more than just a trend; it is a conscious choice that honors the Earth's resources while creating lasting memories. With every wooden gift, we express our gratitude for the wonders of nature and our commitment to celebrating life's precious moments in a meaningful and sustainable way.

    Large Jewelry Box: A Luxurious and Spacious Woodworking Project

    Large Jewelry Box: A Luxurious and Spacious Woodworking Project

    Large Jewelry Box: A Luxurious and Spacious Woodworking Project

    Are you a passionate woodworker looking for a challenging yet rewarding project? Building a large jewelry box is an excellent choice that combines craftsmanship, design, and practicality. This project will allow you to showcase your woodworking skills, create a beautiful piece of furniture, and provide a safe and organized space for your cherished jewelry.

    This article will guide you through the entire process of creating a large jewelry box, from selecting the materials to finishing the final touches. We'll explore design considerations, provide step-by-step instructions, and offer valuable tips for achieving a professional result. Let's embark on this woodworking adventure together!

    Design Considerations

    Before you start cutting wood, it's essential to plan the design of your jewelry box. Consider the following factors:

    Size and Shape

    The size and shape of the box will depend on the amount and type of jewelry you need to store. You can opt for a rectangular, square, or even a more unique shape. Remember, a larger box will offer ample space for all your treasures.

    Materials

    Choose a high-quality wood that complements your style and provides durability. Popular choices include hardwoods like cherry, walnut, oak, maple, and mahogany. You can also experiment with softwoods like pine or cedar for a more rustic look.

    Features

    Think about the features you want to incorporate, such as:

    • Drawers: Multiple drawers can help organize different types of jewelry.
    • Compartments: Create compartments for rings, earrings, necklaces, and bracelets.
    • Mirror: Include a small mirror for easy viewing.
    • Lock and Key: Enhance security and keep your jewelry safe.
    • Decorative elements: Carvings, inlays, or decorative hardware can enhance the aesthetics of your jewelry box.

    Materials and Tools

    To complete this project, you will need the following materials and tools:

    Materials

    • Wood (hardwood or softwood, depending on your choice)
    • Wood glue
    • Finishing nails or screws
    • Wood filler
    • Sandpaper (various grits)
    • Wood stain or paint (optional)
    • Polyurethane or varnish (for finishing)
    • Hardware (hinges, drawer slides, lock and key, etc.)

    Tools

    • Table saw
    • Miter saw
    • Jointer
    • Planer
    • Router
    • Drill press or hand drill
    • Clamps
    • Measuring tape
    • Pencil
    • Chisel
    • Hammer
    • Screwdriver
    • Safety glasses
    • Dust mask
    • Hearing protection

    Step-by-Step Instructions

    Follow these step-by-step instructions to build your large jewelry box:

    Step 1: Cut and Prepare the Wood

    • Cut the wood according to your design using the table saw, miter saw, or jointer.
    • Sand all the pieces with sandpaper to create a smooth surface.

    Step 2: Assemble the Base and Sides

    • Create the base of the box by joining the bottom and side panels using wood glue and finishing nails or screws.
    • Clamp the pieces together while the glue dries.

    Step 3: Construct the Lid

    • Assemble the lid in a similar manner to the base.
    • Ensure the lid fits snugly over the base.

    Step 4: Add Drawers or Compartments

    • If you're adding drawers, cut and assemble the drawer boxes. Install drawer slides to ensure smooth operation.
    • Create compartments by dividing the interior space with wooden dividers.

    Step 5: Attach Hardware

    • Install hinges to attach the lid to the base.
    • Add any other desired hardware, such as a lock and key, handles, or decorative accents.

    Step 6: Fill, Sand, and Finish

    • Use wood filler to cover any imperfections.
    • Sand the entire box thoroughly to create a smooth finish.
    • Apply wood stain or paint, if desired.
    • Seal the wood with a protective finish like polyurethane or varnish to enhance its durability and beauty.

    Tips for Success

    Here are some valuable tips to help you create a professional-looking jewelry box:

    • Use precise measurements: Accurate measurements are crucial for achieving a perfect fit and avoiding errors.
    • Choose high-quality wood: Investing in good wood will make a significant difference in the final product's look and durability.
    • Sand carefully: Smooth sanding is essential for a beautiful finish. Use various grits of sandpaper to achieve a smooth surface.
    • Take your time: This project requires patience and attention to detail. Don't rush through any steps to avoid mistakes.
    • Practice good woodworking techniques: Proper woodworking techniques will ensure a sturdy and well-constructed jewelry box.
    • Add a personal touch: Incorporate decorative elements or custom features to make your jewelry box unique and personalized.

    Conclusion

    Building a large jewelry box is a challenging but rewarding project that allows you to create a beautiful and functional piece of furniture. By carefully planning your design, using high-quality materials, and following these step-by-step instructions, you can craft a stunning jewelry box that you'll cherish for years to come. Remember, woodworking is an art form, so don't be afraid to experiment and add your personal touch to create a truly unique piece.

    Wood Floating Shelves for Small Bathrooms: Space Savers

    Wood Floating Shelves for Small Bathrooms: Space Savers

    Wood Floating Shelves for Small Bathrooms: Space Savers

    In the realm of interior design, particularly within the confines of a small bathroom, maximizing space is paramount. Wood floating shelves emerge as a stylish and practical solution, offering a seamless blend of functionality and aesthetic appeal. These shelves, seemingly suspended in mid-air, create an illusion of spaciousness, liberating precious floor area and enhancing the overall visual appeal of your bathroom.

    Advantages of Wood Floating Shelves

    Wood floating shelves possess a myriad of advantages that make them an ideal choice for small bathrooms:

    Space Optimization

    One of the primary benefits of floating shelves is their ability to maximize space. Unlike traditional shelves that require bulky brackets or supports, floating shelves are mounted directly to the wall, leaving no protruding structures. This minimizes visual clutter and creates a sense of openness, making the bathroom feel larger and more inviting.

    Enhanced Storage Capacity

    Floating shelves provide ample storage space without encroaching on valuable floor area. They can accommodate an array of bathroom essentials, from toiletries and towels to decorative items and plants. The shelves can be strategically placed to optimize storage for specific needs.

    Versatile Design and Style

    Wood floating shelves come in an array of designs and styles, seamlessly blending into any bathroom aesthetic. From rustic reclaimed wood to sleek modern finishes, there is a perfect shelf to complement your bathroom's unique charm.

    Easy Installation

    Compared to traditional shelves, floating shelves are relatively easy to install. The installation process typically involves drilling a few holes in the wall and securing the shelves using sturdy brackets. Many floating shelves are designed for simple DIY installation, allowing you to save on professional installation costs.

    Durability and Longevity

    Wood is a durable and long-lasting material, making floating shelves a reliable storage solution. Wood shelves can withstand the rigors of daily use, providing years of reliable service. They are also resistant to moisture and humidity, making them suitable for even the most humid bathroom environments.

    Choosing the Right Wood Floating Shelves

    Selecting the perfect wood floating shelves for your small bathroom involves considering several factors:

    Size and Dimensions

    The size and dimensions of the shelves are crucial to ensure they meet your storage needs and fit harmoniously within the bathroom's layout. Measure the available wall space carefully and consider the size of the items you plan to store.

    Wood Type and Finish

    The wood type and finish play a significant role in the overall aesthetic of the shelves. Consider the existing bathroom decor and choose wood that complements the existing style. Popular wood choices for floating shelves include oak, walnut, maple, and bamboo. Finishes range from natural wood tones to painted or stained options, providing a wide range of possibilities for personalization.

    Number of Shelves

    Determine the number of shelves required to fulfill your storage needs. Multiple shelves can efficiently maximize vertical space, providing ample storage for various items. The number of shelves will also depend on the size of the bathroom and the available wall space.

    Mounting Brackets

    The mounting brackets are an essential component of floating shelves, ensuring their stability and safety. Choose brackets that are strong enough to support the weight of the shelves and their contents. Consider the type of wall material and select brackets that are appropriate for the installation.

    Creative Ideas for Wood Floating Shelves in Small Bathrooms

    Wood floating shelves offer a plethora of creative possibilities for enhancing storage and style in small bathrooms:

    Towel Storage

    Floating shelves are ideal for storing towels. Place a shelf above the toilet or near the shower to keep towels within easy reach. Choose shelves with a slightly wider depth to accommodate folded towels.

    Toiletries and Essentials

    Floating shelves can neatly organize toiletries and essential items. Install a shelf near the sink to house soaps, shampoos, and other bathroom necessities.

    Decorative Accents

    Floating shelves can showcase decorative accents, such as candles, plants, or artwork. Create a visually appealing display by arranging decorative items on the shelves.

    Storage for Small Items

    Floating shelves can provide storage for small items, such as makeup brushes, hair styling tools, or jewelry. Install a shelf above the sink or near a vanity to keep these items within reach.

    Open Concept Storage

    Wood floating shelves promote an open concept storage solution, allowing for easy access to items and maximizing visual space. This approach can be particularly beneficial for small bathrooms, where minimizing clutter is paramount.

    Conclusion

    Wood floating shelves offer a stylish and functional solution for optimizing storage in small bathrooms. Their space-saving design, versatility, and ease of installation make them an excellent choice for enhancing both the functionality and aesthetics of any bathroom. By carefully selecting the right shelves and incorporating creative ideas for their use, you can transform your small bathroom into a haven of functionality and elegance.

    Beginner-Friendly Wood Projects to Try at Home

    Beginner-Friendly Wood Projects to Try at Home

    Beginner-Friendly Wood Projects to Try at Home

    Are you looking for a fun and rewarding hobby? Woodworking is a great option that can be enjoyed by people of all ages and skill levels. Whether you're a complete novice or have some experience, there are plenty of beginner-friendly projects that you can tackle at home. Let's dive into some simple projects to kickstart your woodworking journey!

    Simple and Satisfying Projects

    You don't need a fancy workshop or a lot of expensive tools to get started with woodworking. These simple projects use basic materials and techniques, making them perfect for beginners.

    Wooden Coasters

    Coasters are a practical and stylish addition to any home. They're also a great way to practice cutting, sanding, and finishing techniques. Start by selecting a sturdy wood like maple or walnut. Cut your wood into squares or circles using a jigsaw or hand saw. Sand the edges smooth and apply a sealant or stain for a polished look.

    Wooden Cutting Board

    A homemade cutting board is a useful kitchen tool that you can proudly display. You can use a variety of hardwoods, including oak, cherry, or walnut. Cut your wood into the desired size and shape. Use a router to create a juice groove around the perimeter to prevent liquids from spilling onto your countertop. Finish the board with mineral oil or a food-safe sealant.

    Wooden Picture Frame

    Show off your favorite photos with a custom-made frame. Choose a wood that complements the picture's theme. Use a miter saw or a hand saw to cut the wood into four pieces that form the frame. Glue and clamp the pieces together, ensuring the corners are tight. Sand and finish the frame with a sealant or stain.

    Tools You'll Need

    Before you dive into woodworking, gather some basic tools that will help you complete your projects successfully.

    • Measuring tape
    • Hand saw or jigsaw
    • Sandpaper (various grits)
    • Wood glue
    • Clamps
    • Safety glasses
    • Dust mask
    • Finishing materials (stain, sealant, etc.)

    Tips for Success

    Here are some tips to make your woodworking journey a success:

    • Start with simple projects. Build your confidence by starting with smaller, easier projects.
    • Practice safety first. Always wear safety glasses and a dust mask when working with wood.
    • Measure twice, cut once. Avoid costly mistakes by double-checking your measurements.
    • Take your time. Woodworking is a skill that takes practice. Don't rush, enjoy the process, and learn from your mistakes.
    • Have fun! Woodworking is a rewarding hobby that can be enjoyed by people of all skill levels.

    As you gain more experience and confidence, you can graduate to more challenging woodworking projects. Remember to explore online resources, woodworking books, and local workshops for inspiration and guidance. Happy woodworking!

    Woodworking Projects That Don’t Require Much Experience

    Woodworking Projects That Don’t Require Much Experience

    Woodworking Projects That Don't Require Much Experience

    Hey there, woodworking enthusiasts (or maybe just curious folks!) Are you itching to get your hands on some wood but feeling a little intimidated by the whole process? Don't worry, you don't need to be a seasoned pro to make some cool things with wood! There are plenty of beginner-friendly woodworking projects out there that will get your creative juices flowing and leave you feeling like a woodworking rockstar.

    The best part? These projects don't require a ton of fancy tools or years of experience. Just a little bit of patience, a willingness to learn, and maybe a few helpful YouTube tutorials, and you'll be on your way to building something awesome.

    So, grab your safety glasses, put on your favorite playlist, and let's dive into some woodworking projects that even a newbie can tackle!

    Simple & Stylish Projects

    Let's start with some projects that are easy to make and look great in any home. These are perfect for those who are just getting started and want to build confidence before moving onto more complex projects.

    Wooden Coasters

    Coasters are a fantastic beginner project because they're small, quick to make, and super useful! You can use scrap wood, leftover pieces from other projects, or even buy some inexpensive wood from your local hardware store.

    Here's what you'll need:

    • Wood (about 1/2 inch thick)
    • Saw (hand saw or jigsaw)
    • Sandpaper (various grits)
    • Wood glue (optional)
    • Finish (stain, paint, or sealant)

    Cut your wood into squares or circles (you can use templates for perfect shapes). Sand the edges smooth, and then apply your chosen finish. Let it dry completely, and voila! You have personalized coasters that will make your friends jealous.

    Wooden Picture Frames

    Picture frames are another great beginner project because they allow you to get creative with different shapes and sizes. You can make a simple rectangular frame or try a more intricate design.

    You'll need:

    • Wood (about 1/2 inch thick)
    • Miter saw or handsaw
    • Wood glue
    • Clamps
    • Sandpaper
    • Finish (stain, paint, or sealant)
    • Hardware (for hanging)

    Cut your wood to the desired dimensions, remembering to account for the thickness of the frame when calculating the size. Use wood glue and clamps to assemble the frame. Once the glue is dry, sand it smooth and apply your chosen finish. Add some hardware for hanging, and you're ready to display your favorite photos!

    Functional & Practical Projects

    Sometimes you need something more than just a pretty face, right? These projects are both functional and stylish, perfect for adding a touch of handmade charm to your home.

    Simple Wooden Shelf

    A shelf is a fantastic way to add storage and organization to any room. You can make a simple floating shelf or a more elaborate shelf unit with multiple tiers.

    You'll need:

    • Wood (for the shelf and supports)
    • Saw (hand saw or jigsaw)
    • Screws
    • Drill
    • Sandpaper
    • Finish (stain, paint, or sealant)
    • Level (optional)

    Cut the wood to the desired size for the shelf and supports. Use screws to attach the supports to the wall, making sure they're level. Then, attach the shelf to the supports. Sand it smooth, apply your finish, and you're ready to organize your books, plants, or other treasures.

    Wooden Cutting Board

    A custom cutting board is a practical and thoughtful gift idea, and it's easier to make than you might think. You can even use salvaged wood for a unique and eco-friendly project.

    You'll need:

    • Wood (about 1 inch thick, preferably hardwoods like maple or walnut)
    • Saw (hand saw or jigsaw)
    • Sandpaper (various grits)
    • Wood glue (optional)
    • Mineral oil or butcher block conditioner (for sealing)

    Cut your wood to the desired size and shape. Sand the edges smooth and round the corners for a finished look. If you're using multiple pieces of wood, glue them together and clamp them until the glue dries. Finally, apply mineral oil or butcher block conditioner to seal the wood and make it food-safe.

    The World of Woodworking Is Yours to Explore!

    These are just a few of the many beginner-friendly woodworking projects out there. With a little bit of creativity and effort, you can create something amazing! Remember to start with small projects, take your time, and don't be afraid to experiment. The more you practice, the better you'll become.

    So go forth, fellow woodworkers, and let your imagination run wild!

    Search This Blog

    Powered by Blogger.